

RDP is a proprietary protocol developed by Microsoft, and is used to provide a graphical means of connecting to a networked computer. It is typically used by administrators to remotely manage servers, and by users to access their own desktops. RDP is based on the T.125 protocol and uses port 3389 by default. Let’s dig in to know more.
What Is RDP (Remote Desktop Protocol) Port?
RDP port is the port on a computer where Remote Desktop Services (RDS) can be accessed. The port can be configured to accept connections on a specific port number or on a random port. These are used by the Remote Desktop Protocol. By default, RDP uses port 3389. RDP port is needed for Windows systems that are configured to allow remote desktop access. This port allows remote users to connect to the system using the Remote Desktop Protocol (RDP).
Learn More: How to Fix Missing Hibernation in Windows 10 | Full Resolution
How To Setup the RDP Port In Windows?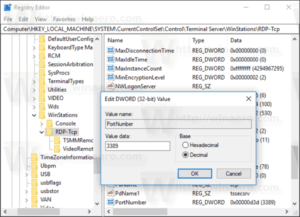
Follow the steps mentioned below to set up the RDP port:
- Go to Control Panel\System and Security\System and then select the “Remote settings” link on the left-hand side.
- In the System Properties dialog box, select the “Remote” tab, then select the “Allow remote connections to this computer” check box.
- Click “Select Users” in the Remote Desktop section.
- Click “Add.”
- In the Select Users or Groups dialog box, do the following:
1. In the Enter the object names to select the text box, type the name of the remote user account that you want to add, and then click “Check Names” to resolve the name.
2. Click “OK.” - On the Remote Desktop Users dialog box, click “OK.”
- On the System Properties dialog box, click “OK.”
- By default, the Remote Desktop feature in Windows Server 2012 listens on TCP port 3389.
How To Change the RDP Port In Windows?
To change the port, follow these steps:
Method 1: Start Registry Editor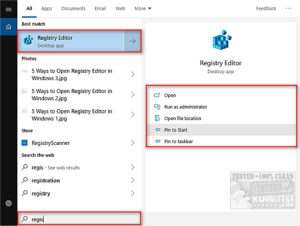
- Locate and then click the following registry subkey: HKEY_LOCAL_MACHINE\SYSTEM\CurrentControlSet\Control\Terminal Server\WinStations\RDP-Tcp\PortNumber
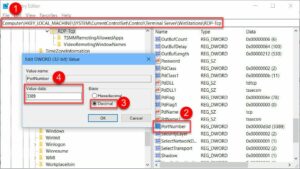
- On the Edit menu, point to New, and then click DWORD (32-bit) Value.
- Type PortNumber, and then press Enter.
- On the Edit menu, click Modify.
- In the Value data box, type the new port number, and then click OK.
- Exit Registry Editor, and then restart the computer.
Method 2: Configure Your Firewall to Allow Remote Desktop
- Open Windows Firewall by clicking the Start button , clicking Control Panel, clicking System and Security, clicking Windows Firewall, and then clicking the Allow a program or feature through Windows Firewall link on the left side.
- If you’re prompted for an administrator password or confirmation, type the password or provide confirmation.
- Click the Change settings button.
- If you’re prompted for an administrator password or confirmation, type the password or provide confirmation.
- On the Exceptions tab, click the Add a program button.
- In the Add a Program window, click the Browse button.
- In the Browse window, expand the Remote Desktop folder, select the Remote Desktop Services application, and then click Open.
- Click Add, and then click OK.
- In the Add a Program window, click the Browse button.
- In the Browse window, expand the Remote Desktop folder, select the Remote Desktop Services application, and then click Open.
- Click Add, and then click OK.
You can now open Remote Desktop Connection and connect to the server by its IP address or computer name.
Read Also: Run Performance Tests On Windows 10 | Here’s How To Do It
Method 3: Connecting to a Remote Desktop Using a Custom RDP Port
It is possible to connect to a remote desktop using a non-standard RDP port. This is a way to make the RDP connection less obvious to hackers and other intruders. To access the remote desktop using a non-standard port, you must first configure the server to use a non-standard port. This is done by changing the port number in the RDP settings of the server.
Once the server is configured to use a non-standard port, you can connect to the remote desktop using that port. To do this, you will need to use the IP address of the server, followed by a colon, and then the port number. For example, if the server is using port 3390, you would connect to it using the following address: 192.168.1.100:3390
You can then connect to the remote desktop using the same credentials that you would use to connect to the server using the standard RDP port.
Conclusion
Well, that’s it for this blog. I hope you found it helpful. To summarize, Remote Desktop Protocol (RDP) is a remote access protocol that enables users to access their computer from a remote location.

