
")
Screen recording on a Mac is simple with built-in tools. This guide shows you how to record audio from your Mac screen and save the recording as a file.
Record Your Screen With INTERNAL AUDIO on Mac (FREE)
What Are The Best Ways To Record Screen On Mac?
There are a few ways to record your screen on a Mac.
- Use Mac’s built-in screen recording feature: To do this, open the Terminal app and type “screen recorder”. This will start recording your screen. (You can also use the keyboard shortcut Command + Shift + R)
- Use a third-party screen recording app: To do this, open the App Store and search for “screen recording app”. (There are a lot of good ones available, so it’s worth trying a few.) Once you’ve found an app that you like, install it. Once it’s installed, open it and click the “Record” button. (You can also use the keyboard shortcut Command + Shift + R.)
- Once you’ve recorded your screen, you can export the video file to a DVD or USB drive. (You can also use the built-in export feature in the Photos app.) Then, you can use the file to produce a professional screen recording.
Learn More: How to Crop A Screenshot On Mac?
8 Best Screen Recording Apps For Mac
Screen recording is one of the best ways to capture your Mac screen and export it as a video. There is a variety of screen recording apps available on the Mac App Store, and each has its own set of features and advantages.
Here are 8 of the best screen recording apps for Mac:
- SumoMe Screen Recording:- SumoMe Screen Recording is one of the most versatile and user-friendly screen recording apps available on the Mac App Store. It has a variety of features, including the ability to capture full-screen or single windows, audio recording, and annotation, and share your recordings via social media, email, or even a cloud storage service like Dropbox.
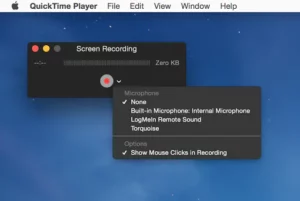
- QuickTime Pro:- If you’re looking for a comprehensive screen recording app with a wide range of features, QuickTime Pro is the perfect option. It has everything from basic recording capabilities to advanced features like screen capturing in high definition and support for third-party microphones.
- iMovie for Mac:- If you’re just looking for a simple and easy-to-use screen recording app, iMovie is a great option. It has all the basic features you need, and it’s easy to learn and use.
- Camtasia Studio:- Camtasia Studio is a well-known and highly-rated screen recording app and for good reason. It has a wide range of features, including the ability to capture
- ScreenFlow:- ScreenFlow is a powerful screen recording app with a wide range of features. It has a built-in editor that lets you customize your recordings, and it supports audio recording and editing. ScreenFlow is also fully compatible with Final Cut Pro, so you can easily share your recordings with other editors.
- QuickTime:- QuickTime is a classic screen recording app that’s still supported by Apple. It has a well-designed interface and is easy to use. QuickTime also has some advanced features, such as support for audio recording and editing.
- Screen:- The screen is a simple, easy-to-use screen recording app that’s perfect for beginners. It has a small learning curve, but it’s packed with features and is compatible with a wide range of Macs. The screen also has support for audio recording and editing.
- Jing:- Jing is a powerful screen recording app that’s perfect for experienced screencasts. It has a wide range of features, including support for audio recording and editing. Jing also has a powerful built-in editor that lets you customize your recordings..
How To Record Internal Audio On Mac?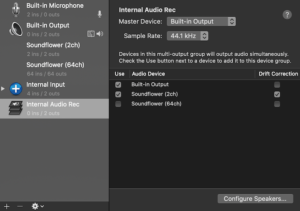
Macs come with a built-in microphone that can be used for recording audio. You can also use an external microphone if you want to improve the audio quality.
- To begin recording, press the “Command” (apple) key and type “record” (without the quotes). This will open the “Audio Recorder” application.
- To begin recording, click the “Record” button and start speaking. The Mac will start recording your voice and will save the recording to your computer.
- To stop recording, click the “Exit” button. The Mac will stop recording and will save the recording to your computer.
- To play the recording, open the “Audio Recorder” application and click the “Play” button. The recorded audio will play in the application.
Also Read: How to Take Screenshots On Windows 10 | Complete Guide
How To Record Audio And Video On Mac?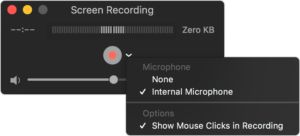
If you’re looking to start recording audio and video on your Mac, there are a few different ways to do it.
- You can use the built-in microphone or camera on your Mac, or you can use an external recording device. To use the built-in microphone on your Mac, open the System Preferences app, and click on the Sound icon.
- In the Sound preferences window, click on the Microphone button. The Microphone preferences window will open. Click on the Record button to start recording.
- To use the camera on your Mac, open the System Preferences app, and click on the Security & Privacy icon. In the Security & Privacy preferences window, click on the Camera button.
- The Camera Preference window will open. Click on the Record button to start recording.
- To use an external recording device, you’ll first need to connect the device to your Mac. You can do this by plugging it into an available USB port or by using a docking station.
- Once the device is connected, open the File menu and click on the Record button. The Record menu will open. Click on the device you want to use to record the audio or video, and click on the Record button.
- Now you’re ready to start recording!

