

If you’re a graphic designer, you’ve probably heard of rasterizing. But what is it, and how can you use it? Rasterizing is the process of converting a vector image into a raster image. This can be useful if you want to resize an image or print it at a higher quality. Read on to learn more about the rasterize command and how to use it in your own design projects.
What Is Rasterize Command And Why Do We Need It?
Rasterize is a term used in computer graphics, meaning to convert a raster image into a vector image. This is done by taking the coordinates of each point in the raster image and mapping them to corresponding coordinates in the vector image. Rasterization is the process of converting a vector image into a raster image.
Learn More: Introduction To Image Dpi | Change The DPI Of Image
Rasterization is necessary when you want to display an image on a screen or print it on a printer. Raster images are made up of squares, or pixels, while vector images are made up of lines. This is useful because it allows the vector image to be manipulated more easily.
The Basics Of How Rasterizing Works?
There are three basic steps involved in rasterizing a graphic:
- Getting the image into a format that can be rasterized. In most cases, this means converting it to a bitmap image.
- Rasterizing the image. This involves using a set of algorithms to map the bitmap pixels to a grid.
- Outputting the results. This involves creating a resolution-appropriate file that can be displayed onscreen or printed.
How To Use Rasterize In Photoshop?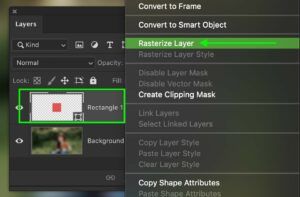
Rasterize is an incredibly useful command that lets you create a simplified version of a document, usually used when you want to copy and paste portions of the document without having to re-create the original artwork.
For rasterizing a section of a document:
- Select the layer you want to rasterize.
- Go to Layer > Rasterize > Layer.
- A dialogue box will appear, giving you the option to choose the desired width and height for the rasterized layer.
- Click OK to rasterize the layer.
How To Use Rasterize In Illustrator?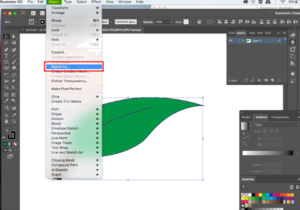
In Illustrator, rasterize is used to convert vector shapes into pixels. This can be useful if you want to create an image that will be displayed on a screen, or if you want to create a print preview that you can use to make decisions about how to proceed with your design.
- To rasterize a vector shape, select the shape and choose Edit > Rasterize. In the Rasterize dialog box, you can specify the resolution at which the shape will be converted to pixels. Higher resolutions will create more detailed images, but may also take longer to render.
- If you only need a rough approximation of the image resolution, you can use the “Best Quality” setting. This will create a resolution that is slightly lower than the maximum possible, but it will still produce a good image.
When you’re finished rasterizing a shape, you can save it as a bitmap image.
Learn More: How To Resize Images In Windows 10 (3 Best Methods)
Tips And Tricks To Use Rasterize
If you’re looking for an easy way to rasterize text and graphics in your documents, then you’ve come to the right place. You can do it with just a few simple steps.
- First, you’ll need to create a new document. In the New Document dialog box, make sure that the Rasterize Text and Graphics check box is selected.
- Next, you’ll need to select the text or graphics that you want to rasterize. To do this, use the Selection tool (V) to select the text or graphics, and then press the D key to choose the Rasterize command from the Edit menu.
- Now, you’ll need to specify the dimensions of the rasterized text or graphics. To do this, use the Properties bar (Window > Properties) to open the Rasterize Text and Graphics dialog box. In this dialog box, you’ll need to specify the width and height of the text or graphics.
- Finally, you’ll need to click the Rasterize button to rasterize the text or graphics. In most cases, this will result in the text or graphics being rasterized into a series of rectangular pixels.
Thanks for reading, and we hope that this article has been helpful.
Conclusion
In conclusion, rasterizing a vector image into a byte array can be a very time-consuming process. However, there are various libraries and tools that can help speed up the process.

