
")
As an iPhone and Mac user, there is always a chance that someone may access your private data on these devices. It is highly recommended to lock the Notes app on Apple devices. This blog will provide you with a complete guide to help lock the notes app on your iPhone, iPad, and Mac.
How To Lock Apple Notes (iPhone, iPad, And Mac)
If you’re looking for a way to lock your Apple Notes so that only you can access them, there are a few different options available to you. On your iPhone or iPad, you can enable a passcode or Touch ID protection for your Notes app. On your Mac, you can lock individual notes with a password.
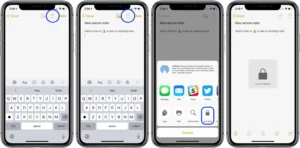
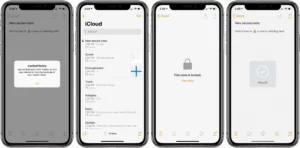
To enable passcode or Touch ID protection for your Notes app on iPhone or iPad, open the Settings app and tap on Notes. Then, scroll down and tap on the Access Notes option. From here, you can choose to require a passcode or Touch ID in order to access your Notes.
Learn More: How to Download A Word Document On Mac | Quick Guide
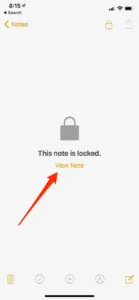
To lock an individual note on your Mac, open the note that you want to lock and click on the Lock icon at the top of the screen. Enter a password for the note and click Lock. You can also choose to encrypt the note with a password by selecting the Encrypt option from the Lock menu.
What Are The Steps To Lock Apple Notes?
Apple Notes is a very useful app and it helps you to store important information. However, as it is a digital app, there is always a slight risk of your notes getting leaked or hacked.
In order to prevent your important notes from getting leaked or hacked, you must lock your Apple Notes app. Your Apple Notes can be locked in two ways. One is by creating a password that will lock your Apple Notes app. The other is by setting up a fingerprint that will lock your Apple Notes app.
To set a password for your Apple Notes app, follow these steps:
- Open the Apple Notes app on your iPhone, iPad, or iPod touch.
- Tap the Settings icon at the bottom of the screen.
- Tap Passwords & Accounts.
- Tap Change Password.
- Enter your current password, then tap Change Password.
- Enter a new password, then tap Change Password.
- Re-enter your new password to confirm, then tap Change Password.
- If prompted, enter your Apple ID password to confirm.
To set up a fingerprint/ face ID for your Apple Notes app, follow these steps:
- Open the Apple Notes app on your iPhone, iPad, or iPod touch.
- Tap the Settings icon at the bottom of the screen.
- Tap Passwords & Accounts.
- Tap Change Password.
- Enter your current password, then tap Change Password.
- Enter a new password, then tap Change Password.
- Re-enter your new password to confirm, then tap Change Password.
- If prompted, enter your Apple ID password to confirm.
- Tap Use Touch ID or face ID.
- Follow the prompts to set up Touch ID or biometrics.
Read More: How To Clear Storage On Apple Watch | Quick Guide
Who Can Access Your Private Notes?
Private notes on your iPhone, iPad and Mac can only be accessed by you and anyone you’ve given permission to. This is because private notes are stored locally on your devices and are not synced to iCloud or any other online service. Therefore, only people with physical access to your devices can access your private notes. They are stored in a secure location and can only be accessed by your Apple ID. Even if someone knows your password, they will not be able to access your private notes.
Conclusion
We hope this article on how to lock Apple Notes on your iPhone, iPad, or Mac has been helpful. If you have any questions or issues, please contact us at any time. Thank you for reading, we are always glad when one of our posts is able to provide useful information on a topic like this!

