

OneDrive is a great way to keep all of your files in one place. This can be helpful if you need to find a document you saved on your computer, or if you want to share a file with someone else. You can also use OneDrive to store images, music, and videos.
Take Screenshot And Save Them To OneDrive- Video Tutorial
How To Take A Screenshot On OneDrive?
If you’re looking to take a screenshot of something on OneDrive, there are a few different ways to go about it.
- The easiest way is to use the windows Snipping Tool. Just open up the document you want to capture and press the Windows+Shift+S keys simultaneously. You’ll then be able to choose the area of the screen you want to capture. Once you’ve made your selection, press Ctrl+S, and the screenshot will be saved to your computer.
- If the windows snipping tool is not working on your computer, you can also use the OneDrive app on your phone or tablet. Just open up the document you want to capture and tap the three-dot menu button in the upper-right corner. Then, tap the Screenshot button and select the OneDrive option. Choose the area of the screen you want to capture. Once you’ve made your selection, the screenshot will be saved to your phone or tablet.
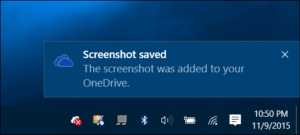
- To access a screenshot on OneDrive, first, open the OneDrive app on your computer. To take a screenshot, press and hold the Windows key + PrtScn (or Apple key + Command + Scr). The screenshot will be stored in the Pictures>Screenshots folder.
The Benefits Of Taking Screenshots On OneDrive
Taking screenshots on OneDrive can be a great way to capture important information or moments for future reference. Additionally, screenshots can be used to illustrate your blog posts, designs, or other content. Here are some specific benefits of taking screenshots on OneDrive:
- Capture Important Information Or Moments: Taking screenshots on OneDrive can be a great way to capture important information or moments for future reference. With a quick screenshot, you can easily capture any important details or visuals related to your work. This can be especially helpful when you need to refer to information later on and don’t have time to go back and search for it.
- Illustrate Your Blog Posts: Taking screenshots on OneDrive can be a great way to illustrate your blog posts. With a quick screenshot, you can easily capture any visuals or images related to your post. This can be especially helpful when you need to provide additional context or information for your readers.
- Create Design Files: Taking screenshots on OneDrive can be a great way to create design files. With a quick screenshot, you can easily capture any visuals or images related to your design. This can be especially helpful when you need to reference or reference images during your work.
- Track Work Progress: Taking screenshots on OneDrive can be a great way to track your work progress. With a quick screenshot, you can easily capture any relevant information or visuals related to your work.
Learn More: How To Fix OneDrive Not Syncing Issue | Complete Resolution
How To Save A Screenshot On OneDrive?
To save a screenshot on OneDrive, follow these steps:
- Open OneDrive.
- Click the File tab.
- Click the Screenshot button.
- Select the area you want to capture.
- Click the Save button.
How To Send Screenshots On OneDrive?
So you want to keep screenshots of your work in OneDrive so you can reference them later. Great idea! Here’s how:
- Open OneDrive on your computer.
- On the left, click Pictures.
- On the right, under “Pictures files,” click Screenshots.
- Click Add.
- Type a name for the screenshot, and then click Save.
- Click OK.
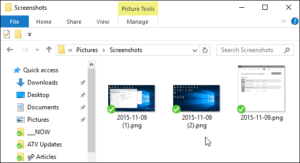
- You’ll now see your screenshot in the Screenshots folder.
- If you want to share the screenshot with someone, click Share.
- Under “Share options,” click Email, and then type the email address of the person you want to send the screenshot to.
- Under “Options,” click Send.
- Your screenshot will be sent to the person you specified.
That’s it! You’ve now stored a screenshot in OneDrive.
Conclusion
There are many reasons why you might want to take a screenshot of a OneDrive file. Maybe you need to show someone a specific piece of information, or you just want to keep a record of what was on that particular file. Whatever the reason, there are a few simple steps you can follow to take a screenshot of the OneDrive file.

