

How to Map a Network Drive in Windows
How to Map a Network Drive in Windows 10:- Video Tutorial
How To Map A Network Drive
If you want to share a folder on your computer with someone else, you can map a network drive for them. A network drive is a folder on your computer that’s accessible over the internet. You can also use a network drive to store files that you share with other people:
- To map a network drive, open File Explorer (Windows 8, 10) or Finder (OS X) and go to the drive that you want to map. Right-click the drive, and then click “Map Network Drive.”
- In the Map Network Drive window, you’ll see a list of shares. If the drive is connected to a network, you’ll also see a list of computers that are connected to the network.
- To map the drive to a specific computer, click the “Browse” button and select the computer from the list. Alternatively, you can click the “Add” button and type the computer’s IP address or hostname.
- When you’re done mapping the drive, click the “OK” button.
- To use the mapped drive, open File Explorer or Finder, and go to the drive. If the drive isn’t mapped, Windows will ask you to map it.
What Is A Network Drive?
A network drive is a special type of drive that uses the network to access files. This means that your network drive can be accessed by other computers on your network.
The Benefits Of Mapping A Network Drive
Mapping a network drive can be beneficial for a number of reasons. For example, it can make it easier to access files on the drive from other computers on the network or to share files with other users on the network. Additionally, mapping a drive can speed up file sharing between computers on the network.
When mapping a drive, it’s important to take into account the security settings of the computers on the network. If the drive is mapped to a secure network drive, any files that are stored on the drive will be protected from prying eyes. If the drive is not mapped to a secure network drive, anyone who has access to the drive will be able to view and access the files stored on it.
- Maps a network drive as C:- When mapping a network drive, it’s important to specify the location of the drive in the computer’s system. To map a drive, type the following command into the command prompt:
- Map c:- The above command will map the C: drive on the computer to the network. You can also map drives by providing the drive letter and the UNC path to the drive. For example, the following command would map the drive c: to server share:
Why You Should Map A Network Drive
There are many reasons to map a network drive.
- First, it can be a quick and easy way to access files and folders on a network from a computer on your network.
- Second, mapping a network drive can make it easier to share files and folders with other people on your network.
- Finally, mapping a network drive can make it easier to access files and folders when you’re not connected to the network.
How To Properly Map A Network Drive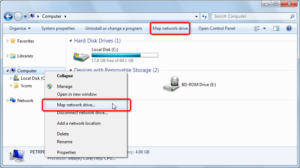
- If you’re mapping a local drive, open your map program and click “Map a network drive.”
- Follow the on-screen instructions to map the drive.
- If you’re mapping a remote drive, open your map program and type ” server share” into the address bar.
- Follow the on-screen instructions to map the drive.
Conclusion
In most cases, you can map a network drive by following these steps:
- Right-click the network drive you want to map and select Map Network Drive.
- On the Map Network Drive dialog box, select the Drive letter you want to map and click OK.
- You’ll see the new drive appear in your Explorer window.
- You can access the files on the drive just like you would any other drive on your computer.

