

One of the most common tasks that we do on Microsoft Excel is formatting the data. One of the most used formatting techniques that we do is making the cell size bigger or smaller. Microsoft Excel provides us with lots of different options to define the size of the cell. In this article, we are going to discuss all the different options that we have and also go through a step-by-step guide on how to make the cell size bigger or smaller in Microsoft Excel.
What Is A Cell Size In Microsoft Excel?
Cell size in Microsoft Excel is the amount of space that a cell takes up on the grid. Its size is measured in pixels and is determined by the width and height of the cell. The width of a cell is the distance from the left edge of the cell to the right edge of the cell, and its height is the distance from the top edge of the cell to the bottom edge of the cell.
Read More: Box Plot In Excel | Create And Format Box Plot In Microsoft 365
Why Do You Need To Change The Cell Size In Microsoft Excel?
There are a few reasons you might need to adjust the cell size in Microsoft Excel.
- Maybe you’re trying to fit more data into a smaller space, or you want to make your sheet more visually appealing. Whatever the reason, it’s easy to change the cell size in Microsoft Excel.
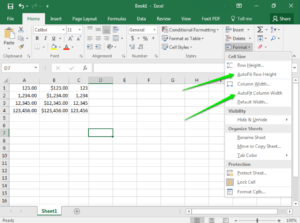
- To make a cell larger, simply click and drag the border of the cell. To make a cell smaller, double-click the border of the cell. You can also adjust the cell size by going to the “Format” menu and selecting “Column Width” or “Row Height.”
- Keep in mind that changing the cell size will affect the overall layout of your sheet. So, if you’re trying to fit a lot of data into a small space, you may need to adjust other elements on your sheets, like the font size or the number of rows and columns.
How To Change The Cell Size In Microsoft Excel?
To change the cell size in Microsoft Excel,
- First, select the cells you want to resize.
- Then, click the “Format” option at the top of the page and select “Column Width.”
- You can then enter the desired width for the cells. Finally, click “OK” to save your changes.
How To Adjust Cell Size In Microsoft Excel?
There is no specific function to adjust cell size in Microsoft Excel. However, you can adjust the row height and column width manually.
- To adjust the row height, hover your cursor over the row number until you see a double-sided arrow. Then, click and drag the arrow up or down to adjust the row height.
- To adjust the column width, hover your cursor over the column letter until you see a double-sided arrow. Then, click and drag the arrow left or right to adjust the column width.
Read More: Google Spreadsheet Graph | How To Create & Customize?
How To Merge Cells In Excel?

There are a few different ways to merge cells in Excel, which can be useful if you want to create a larger cell or adjust the size of cells in your spreadsheet. To merge cells:
- First, select the cells that you want to merge.
- Then, go to the “Home” tab and click the “Merge and Center” button.
- Alternatively, you can right-click the selected cells and select “Merge Cells” from the drop-down menu.
- If you want to un-merge cells, simply select the merged cells and click the “Un-Merge Cells” button on the “Home” tab.
Conclusion
We hope you enjoyed our article about how to change cell size in Microsoft Excel. With this knowledge, we know that you can create the perfect excel document for any project. So what are you waiting for?

