

How to add a border in Google Docs, the classic office suite, is a topic that we have seen being frequently asked on the internet and we are glad that we are able to help you with this topic. A border in a Google Doc is basically a line that surrounds the text and separates it from the background. Learn how to add a border and some of the different types of borders you can add in Google Docs.
What Is A Border In Google Docs?
A border in Google Docs is a line or set of lines that appear around a block of text or an image. You can use borders to add visual interest to a document or to organize and group information. You can create a border by selecting the border tool in the Google Docs toolbar, and then clicking on the location where you want the border to appear.
Read More: Text Box In Google Docs | Add, Format, And Delete (Full Guide)
Different Types Of Borders You Can Add in Google Docs
Google Docs offers a variety of border options you can use to dress up your documents.
Some of the different types of borders you can add include:
- Line Borders: These are simple line borders that can be used to frame a section of text or an image.
- Image Borders: These borders allow you to add a border made up of an image.
- Gradient Borders: These borders feature a gradient effect that can add a bit of pizzazz to your document.
- Patterned Borders: These borders allow you to add a repeating pattern to your border.
- 3D Borders: These borders give your document a bit of a three-dimensional look.
What Is The Use Of A Border In Docs?
A border in a document can be used to create visual interest, frame and highlight important information, or separate different sections of text. Borders can be created using lines, colors, images, or a combination of these elements. When used effectively, borders can add a professional and polished look to any document.
How To Add A Border In Google Docs?
To add a border in Google Docs:
- First, select the text or object you want to border.
- Then click the “Border” button in the toolbar. In the drop-down menu, select the type of border you want to add.
- You can choose from a variety of options, including solid, dashed, and dotted lines.
- You can also add a custom border by clicking the “Custom” option.
- To do this, you’ll need to enter the width, style, and color of the border.
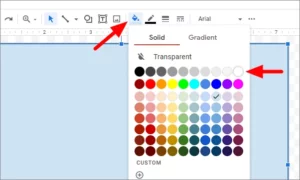
- Once you’re happy with your selection, click the “OK” button to apply the border to your text or object.
You Might Also Like: Add Fonts To Google Docs | Here’s How To Do It
Alternative Method: To add a border in Google Docs:
- First, select the area you want to add a border to.
- Then click the “Insert” menu and select “Drawing.”
- In the Drawing window, click the “Shapes” menu and select the type of border you want to add. Finally, click “Insert” to add the border to your document.
Conclusion
In this article, you have learned how to add borders in Google Docs. This can be useful to make your document look more organized, or to highlight important information. Remember that borders can be set to different line widths, colors, and styles. This is useful if you need your border to be different from the rest of your document’s appearance. Have you used borders in your documents? How did you use them? If you have any questions about borders in Google Docs, feel free to leave a comment below!

