
")
Google Docs is one of the most versatile online document services available. It allows us to write documents, store and edit files, and share files. One of the most common issues we face while using Google Docs is that of formatting text. We don’t want a lot of people messing with the text when we are working on it so we use text boxes. In this blog, we will look at how to add text boxes, work on the text box, and remove text boxes from Google Docs.
What Is A Text Box In Google Docs?
A text box is a rectangular container for text in Google Docs. You can add a text box to a document by selecting the Insert option from the menu and then choosing Text Box from the drop-down list. You can then type your text into the text box and format it using the options in the toolbar. You can also add a border to the text box by selecting the Borders option from the toolbar.
Also Read: How to Check For Plagiarism In Google Docs | Quick Guide
How To Add A Text Box In Google Docs?
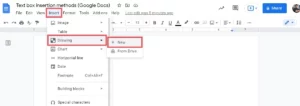
To add a text box in Google Docs, first, create a new document or open an existing one. Then, click “Insert” > “Drawing” > “New” > “Text box” from the menu bar. A text box will appear in your document. You can type your text into the text box or paste text from another source. To resize the text box, click and drag the edges of the text box. To move the text box, click and drag it to a new location.
Move And Resize A Text Box In Google Docs
To move a text box in Google Docs, simply click and drag it to the desired location. To resize a text box, click and drag one of the handles on the sides or corners of the box.
Format Text Boxes In Google Docs
There are a few different ways that you can format text boxes in Google Docs.
- One way is to use the built-in options that are available in the Google Docs interface. To do this, simply click on the text box that you want to format and then click on the Format options button that appears in the toolbar above the text box.
- Another way to format text boxes in Google Docs is to use the Google Docs add-on for Google Sheets. This add-on allows you to format text boxes in a variety of ways, including adding borders, changing the background color, and more. To use the Google Docs add-on, simply open up the Google Sheet that you want to format and then click on the add-ons button in the toolbar. From there, you can select the Text Box Formatter add-on and use it to format your text boxes.
Delete A Text Box In Google Docs
If you want to delete a text box in Google Docs, first select the text box by clicking on it. Once that has been done, press the Delete key on your keyboard. Alternatively, you can right-click on the text box and select Delete from the context menu.
Learn More: Add Fonts To Google Docs | Here’s How To Do It
How To Rotate A Text Box In Google Docs?
There are a few different ways that you can format text boxes in Google Docs.
- One way is to use the built-in options that are available in the Google Docs interface. To do this, simply click on the text box that you want to format and then click on the Format options button that appears in the toolbar above the text box.
- Another way to format text boxes in Google Docs is to use the Google Docs add-on for Google Sheets. This add-on allows you to format text boxes in a variety of ways, including adding borders, changing the background color, and more. To use the Google Docs add-on, simply open up the Google Sheet that you want to format and then click on the add-ons button in the toolbar. From there, you can select the Text Box Formatter add-on and use it to format your text boxes.
Conclusion
In this post, we outlined how you can use text boxes in Google Docs in order to format text, as well as insert, delete, and format text boxes. We hope this article has been helpful to you! If you have any other questions, please leave them in the comments below, and we will be sure to follow up with you.

