

Windows 8 tiles are one of the new features in the latest operating system from Microsoft. Users can customize their Start screen to show the most important information at a glance. However, users may find that some tiles are missing or have been replaced by other tiles. This can be frustrating, especially if the tiles are important to the user.
RECOVER desktop TILES in Windows 8.1 FIXED!!!!!
How to fix missing tiles on your Windows Start Screen
If you find that some of your tiles have disappeared from the Start Screen on your Windows 8 computer, there are a few things that you can do to try to fix the problem.
First, make sure that your computer is set up to display tiles. To do this, open the Charms Bar (by pressing Windows key + C), click on the Settings icon, and then click on the Change PC settings button. Under “Personalization,” make sure that the “Tile size” option is set to “Large.”
If you’re still having problems with missing tiles, you may need to reset your PC. To do this, turn off your computer, insert the Microsoft Windows 8 installation media into your computer, and then turn on the computer. After you log in, press the F8 key to open the Advanced Boot Options menu. On the Advanced Boot Options menu, select the “Reset this PC” option. After your computer has reset, reinstall Windows 8.
If none of these methods work, you may need to replace your Start Screen. To do this, you’ll need to remove the existing Start Screen and replace it with a new one.
Why some of your tiles may be missing on Windows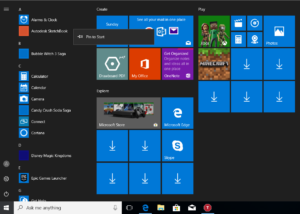
First and foremost, you need to understand how Windows 8 tiles work. When you pin or tile a document or app in the Start screen, it’s essentially saved in the file system as a shortcut. You can access this shortcut and open it just as you would any other file.
Whenever you make changes to the document or app, Windows 8 updates the shortcut in the file system and removes the older version. If you have a lot of shortcuts pinned or tilesed, this can result in some tiles disappearing.
If you have a lot of tiles that have been pinned or tilesed recently and some of them disappear, it’s likely because Windows 8 has removed the old shortcut and replaced it with the new one. If you have a lot of tiles that have been pinned or tilesed for a long time and some of them disappear, it’s likely because the shortcut has been removed from the file system and is no longer visible.
How to troubleshoot missing tiles on Windows
Missing tiles on Windows 8 can be a frustrating issue. Windows 8 is a great operating system, but sometimes it can malfunction and forget to include certain tiles on the Start Screen. This can be caused by a number of different things, but most commonly it is due to an error in Windows 8.
If you are missing tiles on your Windows 8 Start Screen, there are a few things you can do to troubleshoot the issue. The first step is to try reinstalling the operating system. This is a last resort, but it is worth a try if all other solutions fail. If reinstalling Windows 8 doesn’t fix the issue, you can try restoring your computer to a previous point in time. This can sometimes fix missing tiles on the Start Screen. If none of these solutions work, you may need to replace your Windows 8 operating system.
Tips to help you find your missing tiles on Windows
- Firstly, try to use the Search function on your computer to look for any files or folders that may be missing. If you’re missing tiles, you may be missing any files or folders associated with tiles.2. If you still can’t find the tiles, you can use a tool like Microsoft’s File History to restore any missing tiles. File History can be found under the “History” tab in the Windows 8 File Explorer.3. If all of the above methods fail, you may need to reinstall Windows
- If you’ve tried all of the above methods and still can’t find your missing tiles, you may need to reinstall Windows 8.
How to customize your Windows Start Screen tiles
If you are missing some tiles on your Windows 8 Start Screen, this guide can help you customize them to match your style.
To get started, open the Charms Bar by pressing Windows Key + C, or by right-clicking on the screen and selecting “Charms.” On the left side of the screen, under “Settings,” you will see a section for “Tiles.” In this section, you can customize the appearance of your Start Screen tiles by changing their size, color, and texture.
To add or remove tiles from your Start Screen, first open the Start Screen by pressing the Windows Key + X, and then select “Tile Behaviour.” From here, you can add or remove tiles from your Start Screen by selecting the “Tiles” option.
If you want to change the size or color of a tile, first open the tile in question by clicking on it, and then click on the “Settings” button. From here, you can change the size and color of the tile by selecting the appropriate option.
If you want to change the texture of a tile, first open the tile in question by clicking on it, and then click on the “Settings” button. From here, you can change the texture of the tile by selecting the appropriate option.
If you want to keep all of your tiles the same size, but change their color, first open the tile in question by clicking on it, and then click
How to add new tiles to your Windows Start Screen
Adding new tiles to your Windows Start Screen is a breeze, and it’s much simpler than you might think. Here’s how to do it:
1. Open the Start screen, and click the “Start button” in the lower-left corner.
2. If you don’t see the Start screen, click the “All apps” icon in the left column, and then click the “Start screen” tile.
3. In the Start screen, click the “Settings” icon.
4. In the Settings pane, click the “Personalization” tab.
5. Under “Start screen,” click the “Tiles” tab.
6. In the Tiles pane, click the “Add a tile” button.
7. In the “Add a tile” dialog box, type the name of the tile you want to add, and then click the “Add” button.
8. In the “Tile info” dialog box, click the “Set image” button.
9. In the “Set image” dialog box, click the “Browse” button.
10. In the “Browse” dialog box, navigate to the folder where you want to save the tile image, and then click the
Conclusion
Windows 8 tiles have been a staple in the Windows operating system for years, but some users are reporting that their tiles are missing. This problem seems to be affecting both recent and older versions of Windows 8, and it’s not clear what’s causing it. If you’re missing your tiles, there’s not much you can do to fix it. Microsoft is aware of the problem, and hopefully a fix will be released soon.

