
")
Windows 10 is a great operating system, but some users have noticed that their fan runs constantly. This can be frustrating, especially if you’re trying to keep your computer cool. There are a few things you can do to fix this issue. Read this complete guide till the end to know more about it.
Introduction To Windows 10 Fan Runs Constantly Issue
Windows 10 Fans To Run Constantly is a problem where the computer’s fans start running constantly as soon as Windows 10 is booted up. This can happen even if the computer is not doing anything strenuous. The problem can be caused by a number of things, but it is most likely due to a driver issue or a problem with the computer’s power management settings.
What Causes Windows 10 Fans To Run Constantly?
There are a few possible reasons for a CPU fan to be constantly running on a Windows 10 computer:
- The computer is overheating and the fan is trying to cool it down.
- The fan settings in the BIOS are set to run the fan at full speed all the time.
- There is a problem with the fan itself, such as a build-up of dust or debris.
- A virus or other piece of malware is causing the fan to run constantly.
Read Also: Run Performance Tests On Windows 10 | Here’s How To Do It
How To Fix Issues With Windows 10 Fan That Runs Constantly?
Windows 10 Fan Runs Constantly is a very common issue. Many users face this problem when they upgrade to Windows 10. It can be caused by many factors, such as incompatible hardware, outdated drivers, or incorrect settings. You can fix this issue with the help of these 6 methods:
Method 1: Disable Processes Causing CPU Fan to Remain Constant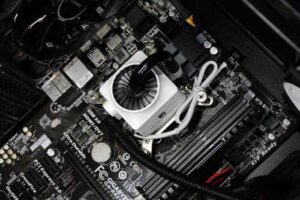
If you find that your CPU fan continues to run constantly, it may be due to one or more processes that are running on your computer. If you are not sure which processes are causing the problem, you can use Task Manager to find out. To do this:
- Press the Windows key + X on your keyboard, then select Task Manager from the menu that appears.
- When the Task Manager opens, click the Processes tab. Then, click the CPU column to sort the list of processes by how much CPU they are using.
- Now, look for any processes that are using a lot of CPU and see if you can identify what they are.
- If you are not sure, you can right-click on the process and select Go to details to find out more information about it.
- Once you have identified the process that is causing the problem, you can right-click on it and select End task to kill it.
- If you are not sure which process is causing the problem, you can try ending all of the processes that are using a lot of CPU to see if that fixes the issue.
If your CPU fan still runs constantly after ending all of the processes that are using a lot of CPU, it is likely that there is a problem with your computer’s hardware or BIOS.
In this case, you will need to contact your computer’s manufacturer for further assistance.
Method 2: Check Background Apps
Background apps can be responsible for the overheating of your laptop. Windows 10 fans keep running all the time because of these apps. To fix this issue, follow the steps given below.
- Click on “Start” and then open “Settings”.
- Click on “Privacy”.
- Click on “Background apps” from the left panel.
- Turn off the apps that you don’t want to run in the background.
- Restart your laptop.
You can also disable all the background apps.
- Click on “Start” and then open “Settings”.
- Click on “Privacy”.
- Click on “Background apps” from the left panel.
- Click on the “Turn off” option.
- Finally, Restart your computer.
Method 3: Update Drivers 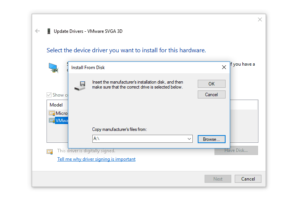
Outdated drivers are also responsible for the overheating of your laptop. If drivers are not updated, then the CPU gets overused which in turn causes the laptop to overheat. To resolve this issue, you can use a driver updater tool.
- Download Bit Driver Updater on your laptop.
- Install and open the tool.
- Scan your computer for outdated, corrupted or broken drivers. Update the drivers automatically.
- Restart your computer after updating all the drivers.
You can also update drivers manually. To do this:
- Go to the manufacturer’s website and search for the latest drivers for your computer.
- Choose the drivers for your laptop.
- Download and install the drivers.
- Restart your computer.
Learn More: How to Stop Programs From Running At Startup In Windows 7?
Method 4: Change Power Settings
Power settings are also responsible for the overheating of your laptop. You can fix this issue by changing the power settings. Follow the steps given below:
- Click on “Start” and then open “Settings”.
- Click on “System”.
- Click on “Power & Sleep”.
- Click on “Additional Power Settings”.
- Click on “Change Plan Settings” for the selected plan.
- Click on “Change Advanced Power Settings”.
- Click on “Processor Power Management” from the list.
- Expand “System Cooling Policy”.
- Change both settings to “Passive”.
- Click on “OK”.
- Restart your computer.
Method 5: Disable Fast Start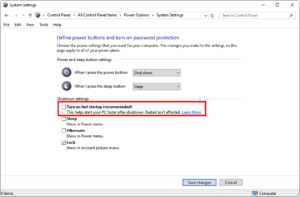
Windows 10 has a fast start feature. This feature can cause your computer to overheat. To fix this issue, disable the fast start feature.
- Click on “Start”. Click on “Power”.
- Hold down the “Shift” key and click on “Restart”.
- Click on “Troubleshoot”.
- Click on “Advanced Options”.
- Click on “Startup Settings”.
- Click on “Restart”.
- Press the “4” key to enable the disable fast start option.
- Restart your computer.
Method 6: Use Laptop Cooler
If you are still facing the issue of the fan running all the time, then you can use a laptop cooler. This will help in cooling down your laptop.
Conclusion
Windows 10 fans that keep running all the time can cause your computer to overheat. The issue can be resolved by using the methods given above.

