We often take the things we use for granted. One such thing is the fonts, which make our communication process easier. We use different Fonts for a variety of reasons. Some of them are personal; some are professional. But the question is how to install custom fonts on your device. Well, this blog will help you understand how to install custom fonts on iPhone and iPad.
What Are Custom Fonts And Why Do We Need Them?

Custom fonts are fonts that are not installed by default on an iPhone or iPad. They are usually downloaded from the App Store or from a website.
Learn More: Add Fonts To Google Docs | Here’s How To Do It
There are many reasons why someone might want to use a custom font. Maybe they want to match the font of a specific website or document. Or maybe they want to use a font that is not available in the default iOS system fonts. Whatever the reason, custom fonts can add a unique touch to an iPhone or iPad. They can make text stand out and add personality to a device.
Things To Keep In Mind While Using Custom Fonts
There are a few things to keep in mind when using custom fonts, however:
- First, not all apps support custom fonts. So, if you want to use a custom font in a specific app, you will need to check to see if the app supports it.
- Second, custom fonts can impact battery life. This is because the font files are stored on the device and need to be loaded every time they are used. So, if you are using a lot of custom fonts, it is a good idea to keep an eye on your battery life.
- Overall, custom fonts can be a great way to personalize your iPhone or iPad. Just be sure to use them sparingly and check for compatibility before you use them in an important document or app.
What Apps Can We Use To Install Custom Fonts On The iPhone And iPad?

There are a few apps that we can use to install custom fonts on the iPhone and iPad. One of the most popular apps is iFont, which allows us to browse and install a wide range of fonts from different sources. Another popular app is AnyFont, which also offers a wide range of fonts to choose from.
Both of these apps are available for free from the App Store, and they are very easy to use. Simply install the app, browse for the fonts you want, and install them onto your device. You will then be able to use them in any app that supports custom fonts, such as word processors and design apps.
Note: You can always uninstall a font if you don’t like it. Simply go to the Settings app, select the “Fonts” section, and then select the font you want to remove. If you’re having any trouble, the app’s support page should have more information on how to uninstall fonts.
How To Install Custom Fonts On iPhone And iPad?
iOS 13 introduced a new font management system that makes it easier to install, activate, and deactivate custom fonts on your iPhone or iPad. Here’s how it works:

- First, you’ll need to find and download the custom font you want to use. There are many websites that offer free fonts, or you can purchase fonts from independent font designers. Once you’ve downloaded the font file, unzip it to access the .ttf or .otf file inside.
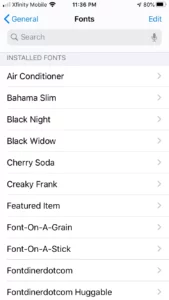
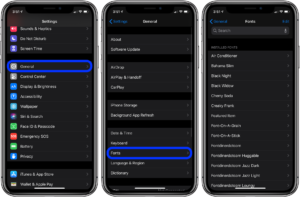
- Next, open the Settings app and navigate to General > Fonts. Here, you’ll see a list of all the fonts installed on your device. Tap the “Add New Font” button, and select the .ttf or .otf file you downloaded.
Read More: How To Change Google Docs Background Color | Full Guide
The new font will now be available in any app that supports custom fonts. To activate or deactivate a font, simply toggle the switch next to its name.
Conclusion
This is a complete guide on how to install custom fonts on your iPhone and iPad. Both devices will follow the same process but with a few different steps. Custom fonts can be used on your device, you can also use them in different applications, and everything you need to do to install them is explained in this guide.


