

Windows 10 Home and Windows 7 Home Basic both include a homegroup feature. This article will show you how to set up a homegroup between these two versions of Windows.
How To Share Content Between Windows 7, 8, 8.1, and 10 Devices Using Homegroup
Creating A Homegroup In Windows
Windows 10 introduced a “Homegroup” feature that allows you to easily share files and folders between your computer and other devices that are members of your homegroup. To create a homegroup in Windows 10:
- Open the “Settings” app on your computer.
- Under “Network & Internet,” click “HomeGroup.”
- If your homegroup is not already listed, click “Create a homegroup.”
- Enter the name of your homegroup, and then click “Create.”
- If prompted, agree to the terms of the homegroup agreement.
- Select which devices you want to be part of your home group.
- Click “Done.”After creating your homegroup, you can access files and folders on your computer and the devices that are members of your homegroup with the same username and password.
Joining A Homegroup In Windows
Windows has always been a great operating system for networking. In fact, it was one of the first operating systems to ever have a feature called “Networking.” Windows 10 is no different. In fact, Windows 10 has even improved networking features that were available in previous versions of Windows:
- One of the new networking features in Windows 10 is the ability to create a homegroup.
- A homegroup is a group of Windows 10 devices that are configured to share files and folders.
- This is a great way to organize your files and keep them all in one place.
- To create a homegroup, first, open the “Settings” app on your computer.
- From there, click on ” Network & Internet “
- Click on the “Homegroup” button.
- This will open the “Homegroup” window.
- To join a home group, first, make sure that your computer is connected to the internet.
- Then open the “Homegroup” window on your computer and click on the “Join a Homegroup” button.
- You will then be asked to enter the name of the home group.
- Once you have entered the name, click on the “Join” button.
- Your computer will now be part of the homegroup.
- You can now share files and folders with other members of the home group.
Creating A Homegroup In Windows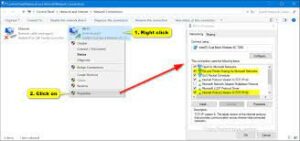
A home group is a collective of compatible devices that share files, printers, and other resources. To create a homegroup in Windows, follow these steps:
- Open the Control Panel.
- Click Network and Sharing Center.
- Click HomeGroup.
- If necessary, click the Add a Homegroup button.
- Enter the name of your homegroup, and then select the network location(s) from which members will be able to join the homegroup.
- Click the Create Homegroup button.
- Now that your homegroup is up and running, you can share files and printers with the other members.
- To share a file, click the Share button, and then select the file.
- To share a printer, click the Add a Printer button, and then select the printer.
- You can also share files and printers using the Windows File Sharing feature.
- To do this, open the File Sharing dialog box, and then select the share you want to use.
- Finally, you can use the Homegroup Connections feature to manage the connections between members of your homegroup.
- To do this, open the Homegroup Connections dialog box, and then click the Connections tab.
- Now that you know how to create and join a homegroup in Windows, be sure to take advantage of the shared resources that your homegroup offers!
How To Join A Homegroup In Windows
Are you looking to join a homegroup between Windows 7 and 10? If so, you’re in luck! Joining a home group is easy and doesn’t require any special software. Here’s how to do it:
- Open the Start Menu on your Windows 7 PC. Type “networking” into the Start Menu’s search bar, and then press Enter.
- When the Networking window appears, click the link that says “HomeGroup.”
- On the HomeGroup window that appears, click the link that says “create a new homegroup.”
- On the Create a New HomeGroup window that appears, type a name for your homegroup in the Name field and then click the Add button.
- Click the Members button, and then click the Add button next to the computer you want to join your homegroup to.
- Click the Ok button when the Add Computer window appears.
Your computer should now be a member of your home group. You can now share files and printers with other members of your homegroup, and you can also use the HomeGroup features of Windows 10 to share files and printers with other Windows 10 PCs in your homegroup.
Differences Between Windows And Homegroups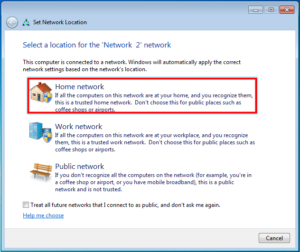
Windows 7 and 10 offer a homegroup feature that allows you to share files and folders between your devices. This is great for when you need to work on the same document on your laptop and your tablet, for example.
Here are some key differences between homegroups and Windows 10’s OneDrive:
- Homegroups are limited to a certain number of devices.
- Files and folders shared between devices in a homegroup are only accessible to members of the homegroup.
- You can’t individually share files or folders with other people.
- You can’t access homegroup files or folders from outside of the homegroup.
- You can’t delete homegroup files or folders.
While there are some limitations to homegroups, they’re a great way to share files and folders between devices. If you’re looking to take advantage of OneDrive’s features, we recommend checking out our guide to the best OneDrive options for Windows 10.
Conclusion
Windows 10 and Windows 7 have different homegroup configurations. There are steps you can take to configure Windows 10 to work with your homegroup settings from Windows 7.

