

Windows 10 has a new feature called Hosts Files. This feature allows you to control which host file applications can access. By default, Windows 10 allows all applications to access the host’s file. If you want to restrict access to specific applications, you can edit hosts file in windows 10. Read till the end.
Edit Hosts File In Windows 10- Video Tutorial
How To Edit Your Hosts File In Windows?
This is a very important step in order to improve your internet experience, especially if you are having some trouble with streaming or downloading content:
- First, open up File Explorer by clicking the Start button and typing “File Explorer” in the Search box.
- Next, open up the “hosts” folder.
- Finally, double-click on the “hosts” file to open it.
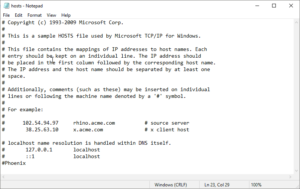
- Now you will need to find the line that says “127.0.0.1 localhost.”
- You will need to update this line to look like this “127.0.0.1 yourdomain.com.”
- Now save the file by clicking on the “File” menu and choosing “Save.”
- Finally, you will need to reboot your computer in order for the changes to take effect.
Learn More: How to Stop Programs From Running At Startup In Windows 7?
What Can Happen If You Don’t Edit Hosts File In Windows?
There are a few potential problems that can occur if you don’t edit your host’s file in Windows:
- The first is that you may not be able to access certain websites. This can happen if your host’s file is blocked by your internet provider or if your computer is not connected to the internet. If this is the case, you’ll need to contact your internet provider or administrator to unblock the host’s file.
- The second problem is that your computer may not be able to connect to certain networks. This can happen if your host’s file is outdated or if it’s not properly configured. If this is the case, you’ll need to update your host’s file and reconfigure your network settings.
- Finally, if your host’s file is corrupted, your computer may not be able to connect to any network. In this case, you’ll need to restore your computer to its original configuration and re-install all of your software.
How To Prevent Editing Your Hosts File In Windows?
In Windows 10, the host’s file is a text file that is used to map IP addresses to hostnames. This file can be edited by any user, which can be potentially harmful. The host file is used by the Windows operating system to resolve hostnames to IP addresses. This is important for tasks such as connecting to a network, accessing the internet, and sharing files. The host file is located in the C: WindowsSystem32driversetc directory. By default, only members of the Administrators group can access this file.
When you open the host file in Windows 10, you’ll see a list of host names. Each hostname is followed by an IP address. You can add or remove host names from the list. You can also change the IP address associated with a hostname. If you want to prevent other users from editing the host’s file, you can set the permissions on the file to restrict access.
To prevent other users from editing the host’s file, follow these steps:
- Open the Windows 10 Control Panel.
- Under System and Security, click Security.
- Under System Security, click Advanced Security.
- Under Windows Security, click OK.
- Under the Protection tab, click Edit Hosts File.
- Under the Allow column, select the option that you want to use.
What To Do If You Accidentally Edit Hosts File In Windows 10?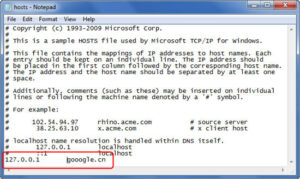
If you find yourself editing your Windows host file without knowing what you’re doing, there are a few things you can do to prevent problems:
- First, make sure that you know what you’re doing before you start editing the host’s file.
- If you don’t, please take the time to read our article about how to edit your host’s file on Windows 10.
- If you’re still not sure what you’re doing, you can always consult our online host’s file guide to help you out.
Once you’re familiar with how to edit your host’s file, here are a few things to keep in mind:
- Don’t make any changes to your host file unless you’re absolutely certain that you know what you’re doing.
- Always back up your host’s file before you make any changes to it.
- Remember to erase your old host’s file before you make any changes to it.
- Be careful not to delete any critical system files when you’re editing your host’s file.
- If you experience any problems while you’re editing your host file, please consult our article about how to fix common host file problems on Windows 10.
You Might Also Like: Run Performance Tests On Windows 10 | Here’s How To Do It
Conclusion
If you’re having trouble connecting to a particular edit host or if you just want to make general changes to your host’s file on Windows 10, you can use Windows 10 File Explorer. First, open File Explorer by clicking the Windows icon on the taskbar, and then click File Explorer. Next, click the Computer icon. Finally, click the Properties tab, and then click the Advanced button. Under “Hosts file location,” click the Browse button, and then select the C: WindowsSystem32driversetchosts file. Click the OK button to save your changes.

